This page will detail every slider, button and option available on the WebGUI so you have a better idea of what you're doing. All information is up to date as of 25/02/2023. However, due to the speed at which the WebGUI updates, some information may be outdated in the future.
Model Switcher
The model switcher is located in the top-left corner of the GUI, and it allows you to easily load and switch between different models. All models are located in the
For beginners, it's recommended to have one model named
It's also important to note that you can rename your model files however you like, and the GUI will still detect them as models as long as the file ends in either a
The refresh button located next to the model switcher will reload the list of models. This is useful if you've added or changed models while the GUI is open, and you don't need to reload the entire GUI to do this - just click the refresh button.

Main Tabs
The main tabs shown below are the main screens of the GUI. You can switch between each tab to access different features. Switching tabs does not interfere with any processing happening on the current tab, so you can switch tabs while generating images, training models, or doing anything else. However, you cannot use other features while one tab is active.
Additional tabs may appear depending on the extensions you install on the GUI.
The following sections will provide more details about the default tabs available on a clean install of the Web GUI.

Txt2Img Tab
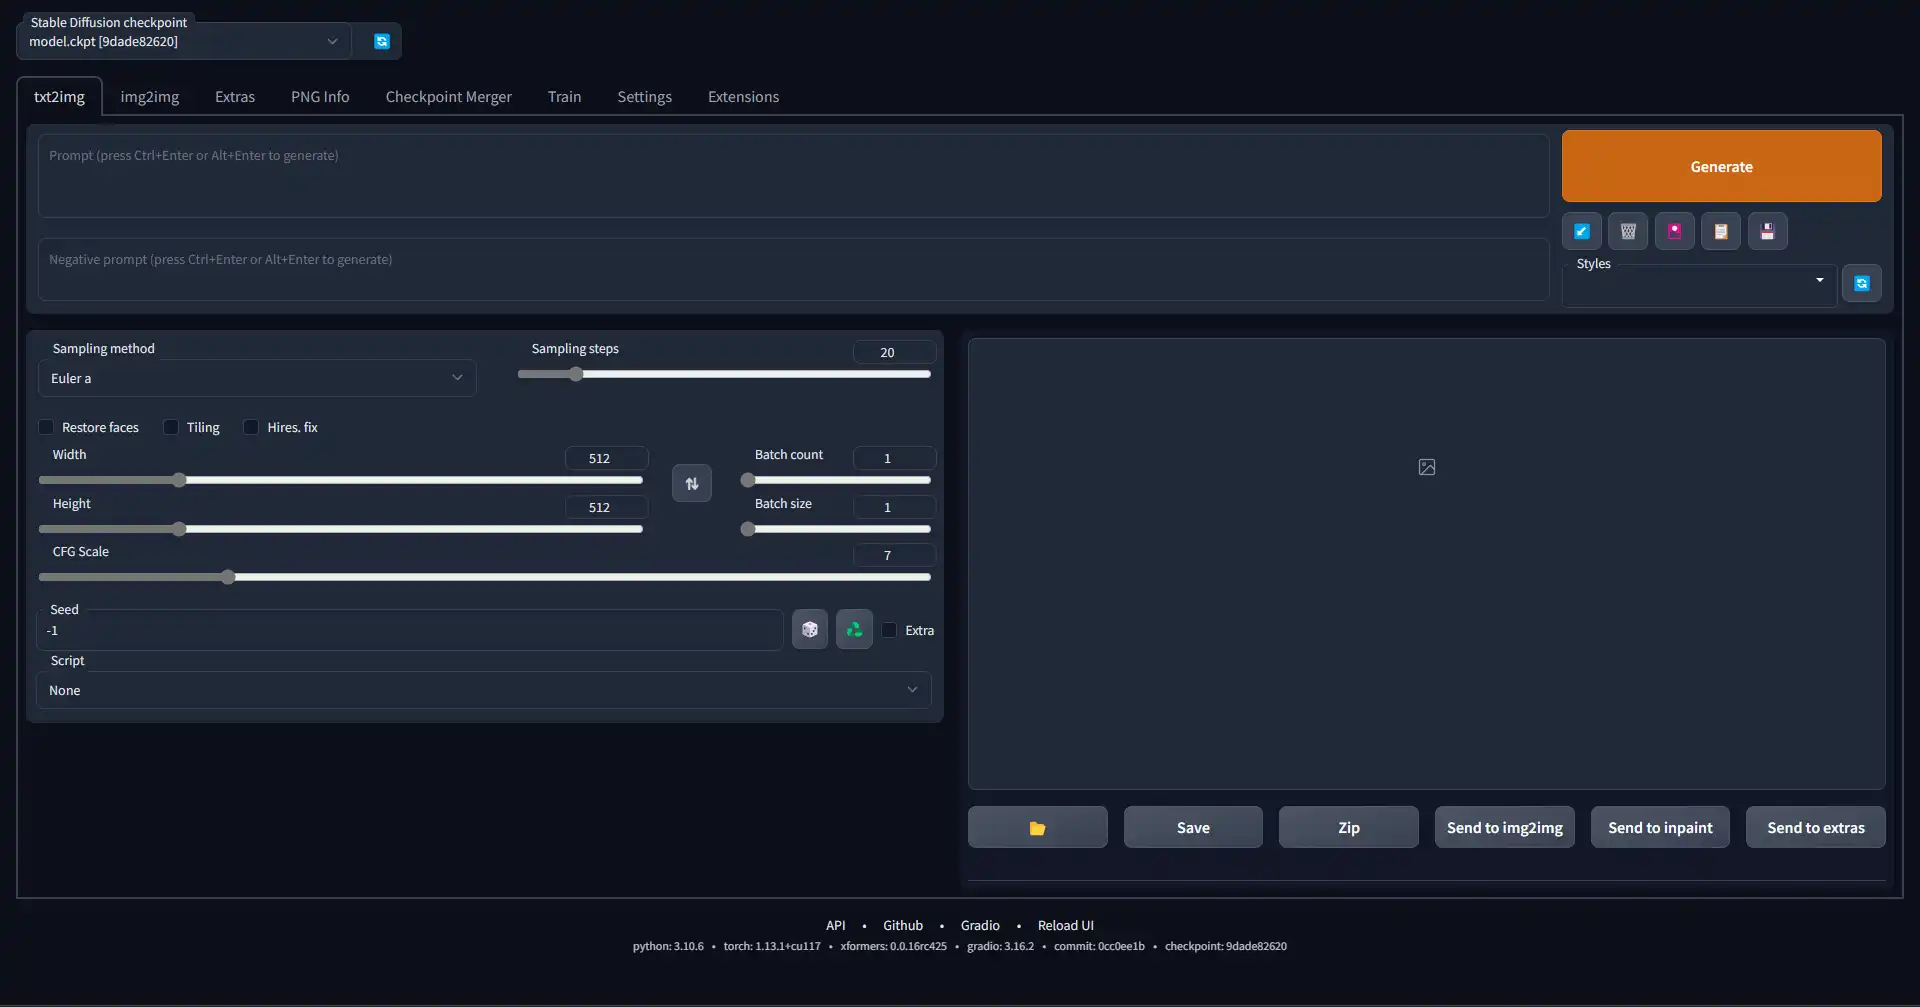
The text2image tab is the most used tab of the WebGUI and allows you to generate images using text prompts, textual embeddings and other features you can add using extensions. If you're wanting to generate a completely new image not based on any source material, this is the tab you use.
Below is an overview of what every button and slider on the interface does. More detailed information about the technical aspects of some options are available on their respective pages on this site, for example the Models page for a list of models and how they work.
The most important part of the interface is of course the prompt inputs. You'll see 2 text boxes, one for your main prompts and a second for your negative prompts. I have already covered prompting in great detail on the Prompts page. There are a lot of ways you can prompt and it is the main way to specify how you want the image to look.
You can also Ctrl+z to undo the last text you added or removed.

While face restoration can create more coherent faces, more often it will generate a generic face that does not resemble the original face at all. You can reduce the effect of the restoration with a slider in the settings, but results can still be quite different from the original face.
It works surprisingly well, however it may be harder to get exactly what you're looking for using your prompts.
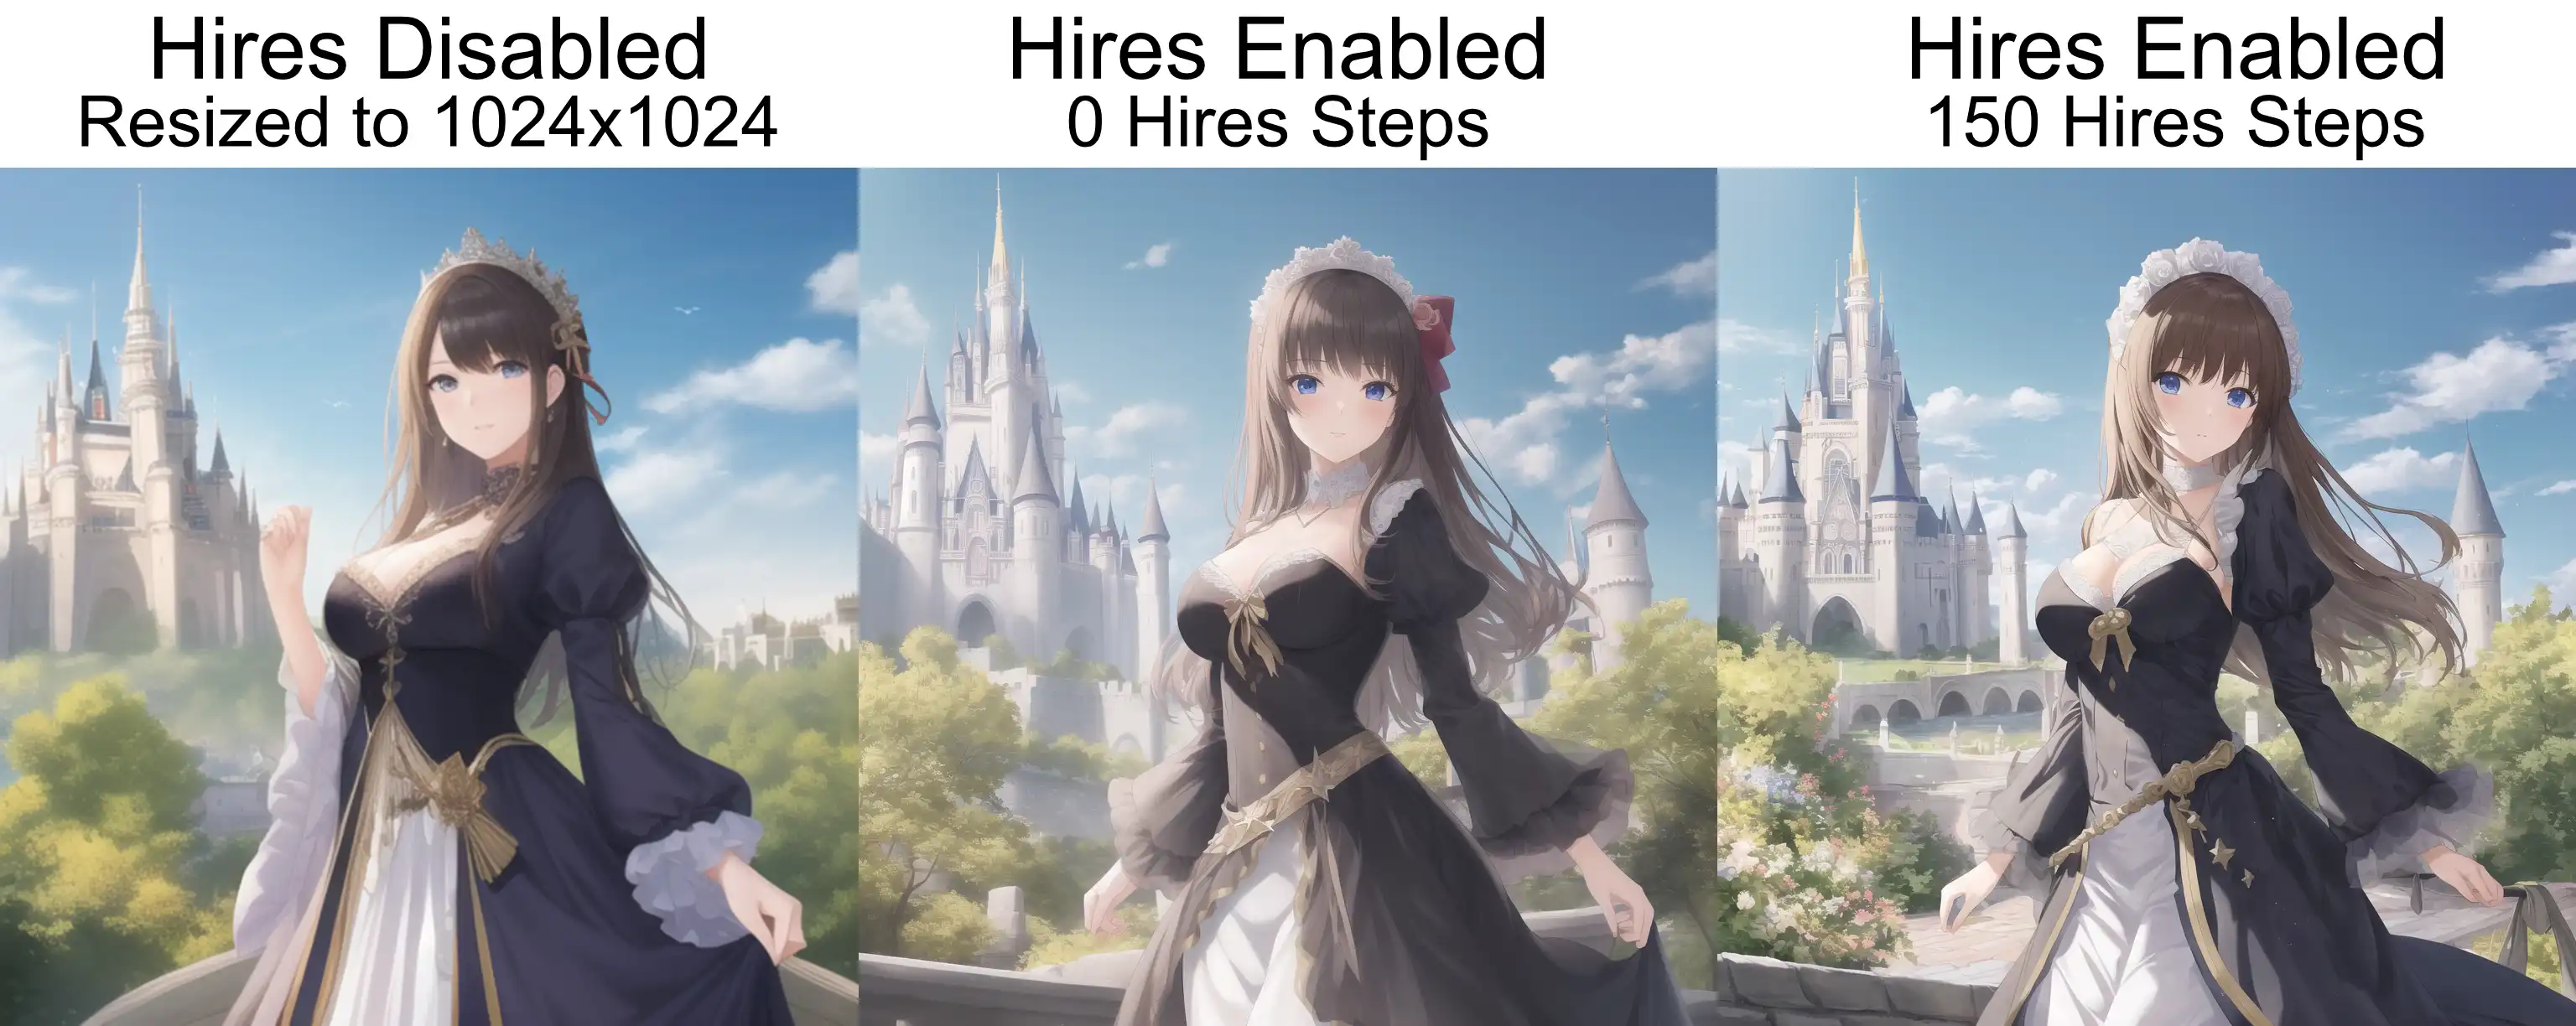
Hires. Fix
It does still require more VRAM than a normal generation and the larger you want to upscale, the more VRAM required.

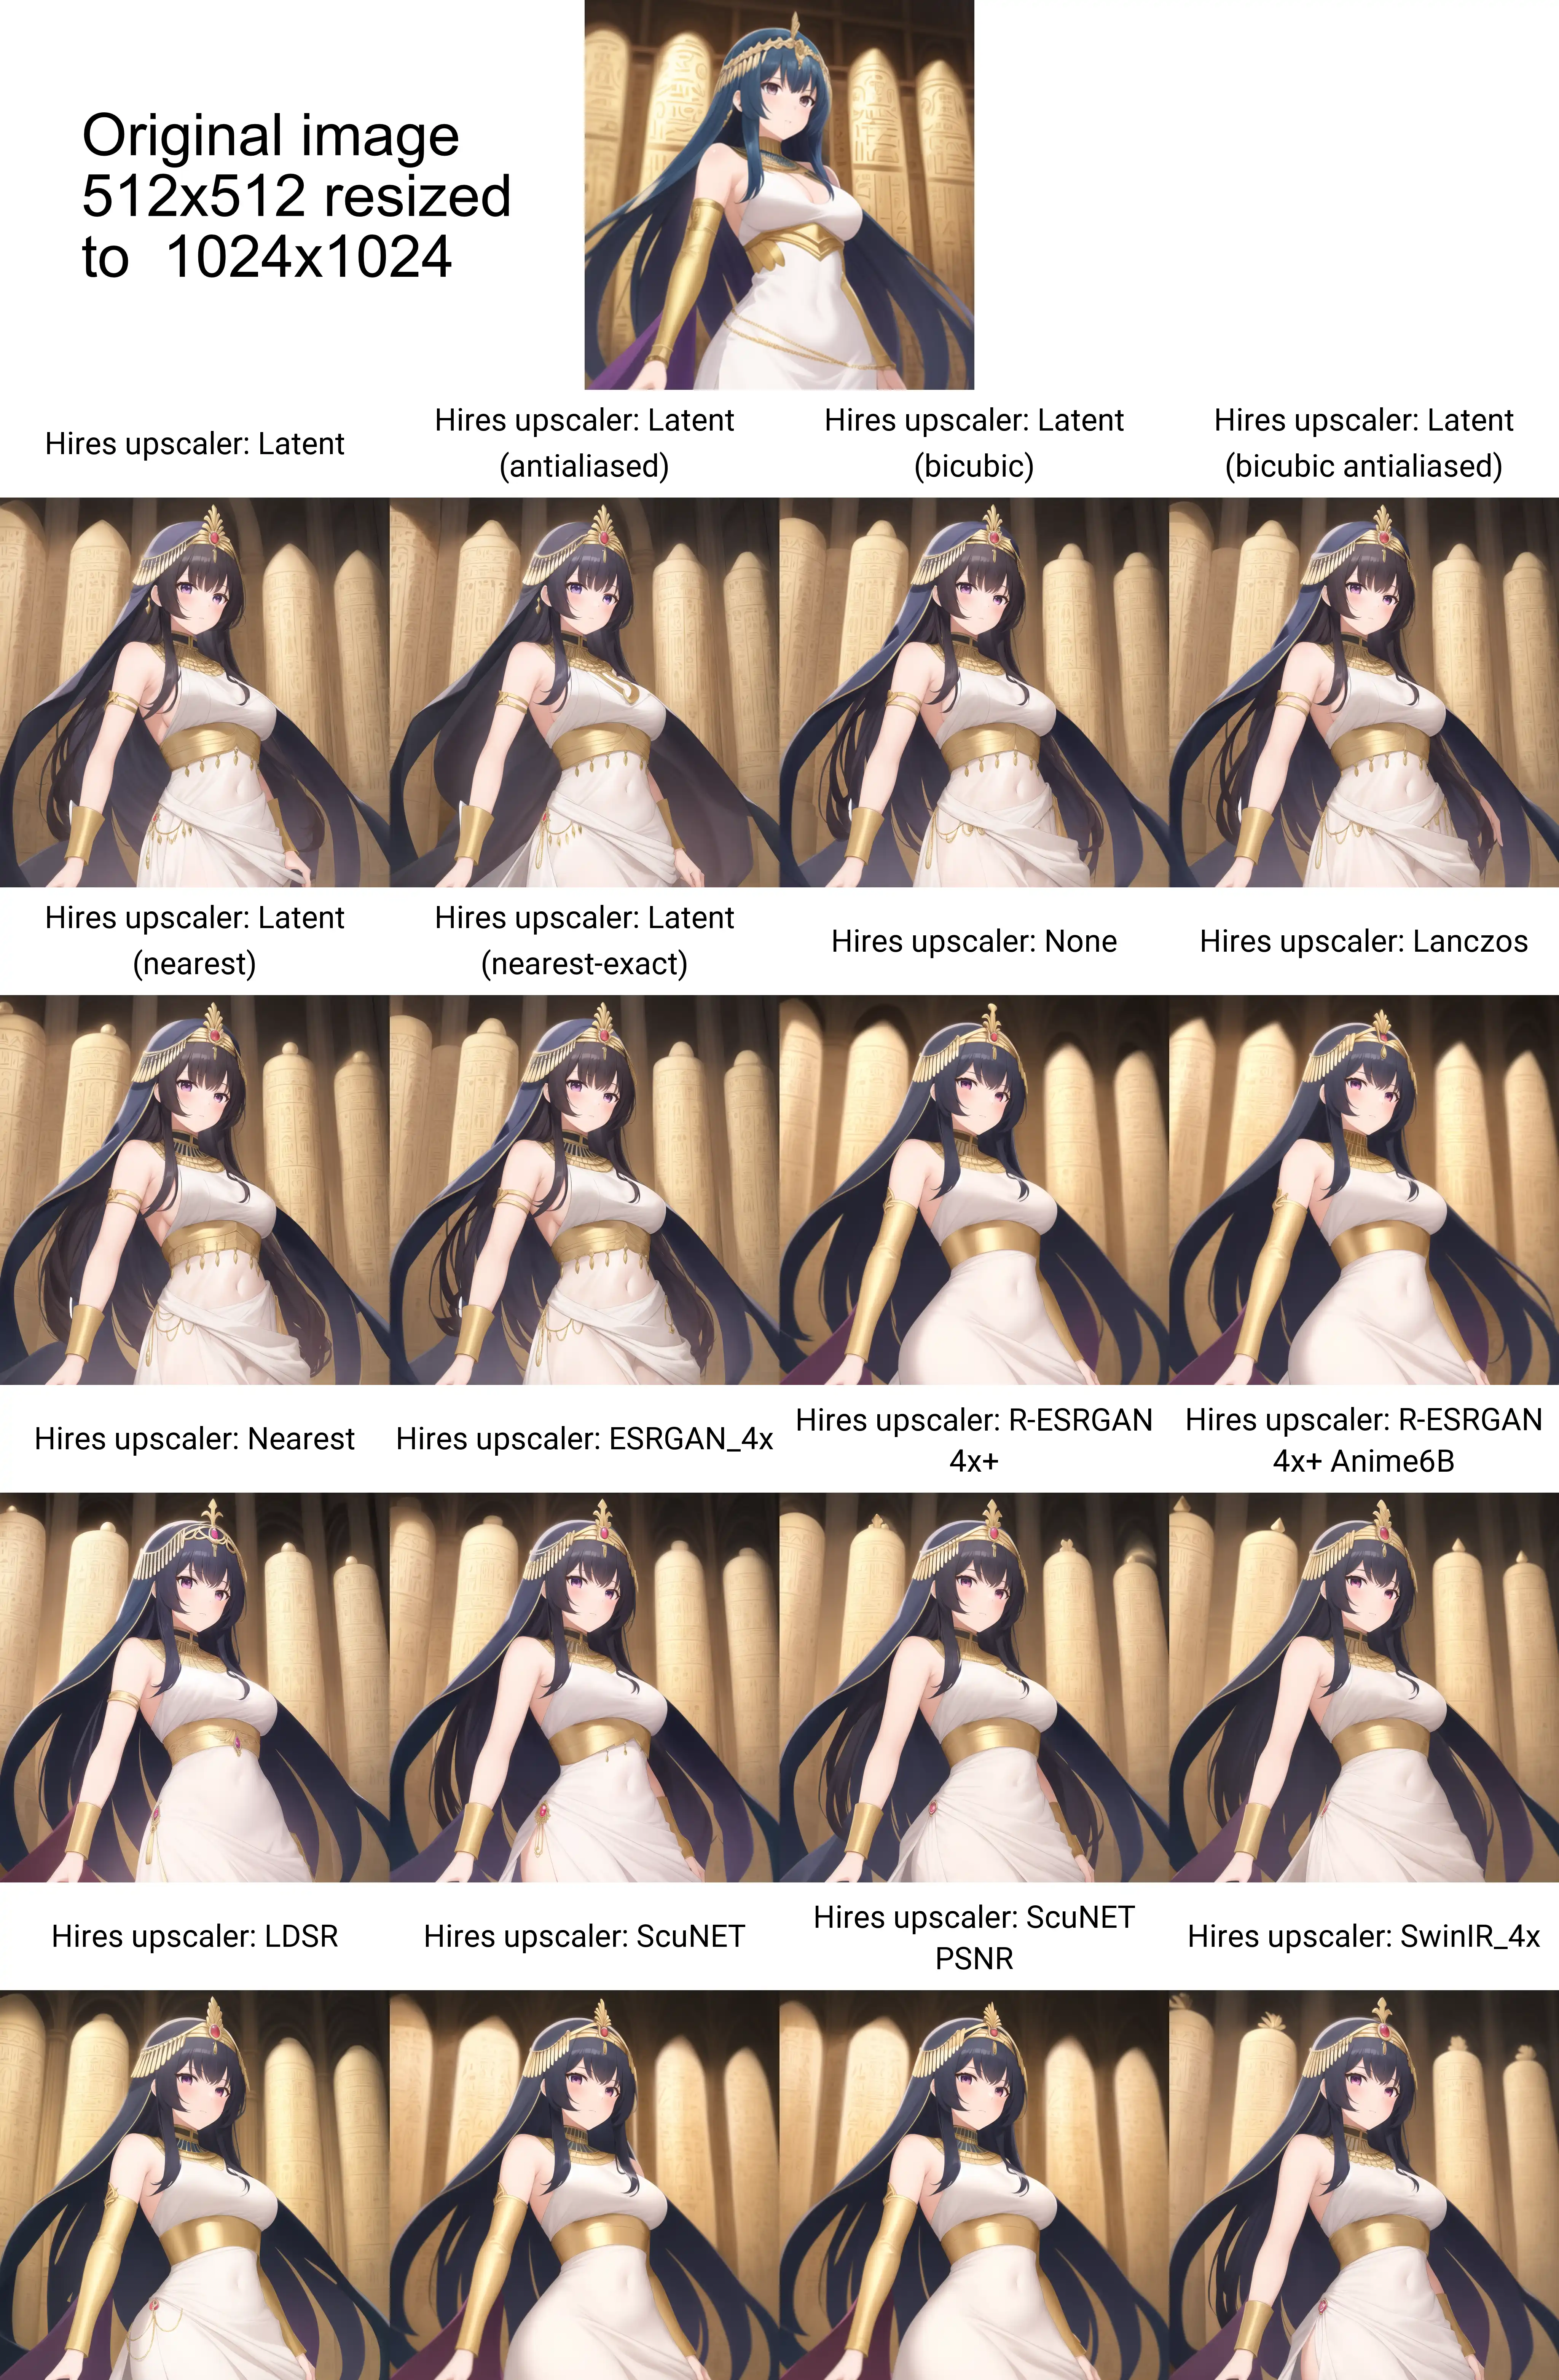
If you are using any Latent upscaler model, it is recommended to set the denoising strength to 0.5 or above, as lower values may result in blurry or pixelated images. Due to this, it is suggested to use the Latent upscalers only if you want more detail to be generated in the image. If you simply want to upscale the resolution, you can use any non-Latent model. However, please note that a high denoising strength may still change certain elements of your image, regardless of the chosen upscaler model.
Keep in mind that trying to set the width/height to values that don't match the original aspect ratio will crop the image to fit the new dimensions, which may not always result in the desired output.
Since most models are trained on square images, generating landscape or portrait images may create glitchy artwork more often. It's recommended to use the Hires. fix if you are trying to create images with a different aspect ratio or if the image size is much larger than 512x512.
It's also important to note that all the images generated will use the same parameters each time as there is no in-built way to vary the parameters in a batch generation.
Stable Diffusion's randomness is deterministic, meaning that if you know the seed value (along with the other parameters) for a specific image, you can recreate the image exactly as the original. However, as previously mentioned, the seed value is only a starting point, and changing other parameters in the model can result in subtle or extremely different images being generated.
The dice button next to the seed input will set the input to -1, which prompts the WebGUI to pick a random seed each generation.
The Recycle button next to the seed input allows you to reuse the last generated seed, which is helpful if you want to create variations of an image you previously liked. You can retrieve the seed with this button and experiment with other settings to achieve different results.
Tick the checkbox next to the seed input to access the extra section, which lets you add more randomness elements to your generation.
Seed Extras

The seed extras section allows you to add even more randomization to your generations so you can create more varied outputs of a similar object or subject.
You can install new scripts from the Extensions tab or manually copy the Python script into the
If you right-click the Generate button, you have the option to generate forever. As the name suggests it will keep generating images until you right-click and choose to stop generating. Generating forever will work the same as clicking the generate button normally, so if you have a batch count, it will still generate the full batch per each cycle of the generate forever generation.
When you click Generate, 2 grey buttons will replace it, these buttons are "Interrupt" and "Skip". Interrupt will stop generation completely at the next available point. Skip will simply skip over the current image and start generating the next image in the queue if there is a queue. Interrupt will not stop the generate forever option.
If you are using the Generate Forever option, it's recommended to either have a good cooling system on your computer or keep an eye on the tempuratures as long periods of high tempuratures can degrade electronics faster.
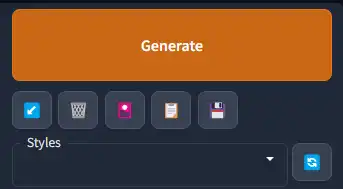
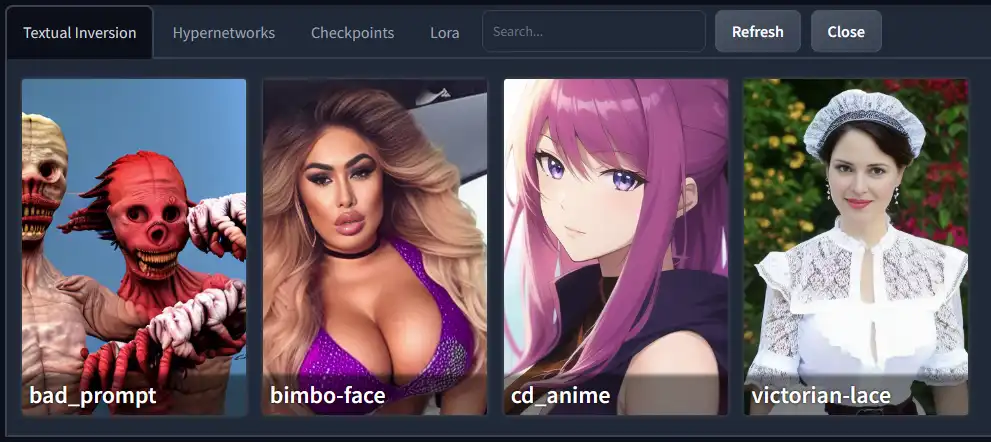
Click on the embedding, checkpoint, etc that is listed and it will automatically activate the selected one or add it to the prompt list.
On your screen, the listed files will not have a preview image like shown below. This is because you need to create the preview yourself or add a preview image to the corresponding folder and title the image
To add your own preview image using the GUI, you can generate an image, then hover on the title of the embedding and click the "replace preview" button that appears. This will copy the last generated image to become that embeddings preview image.
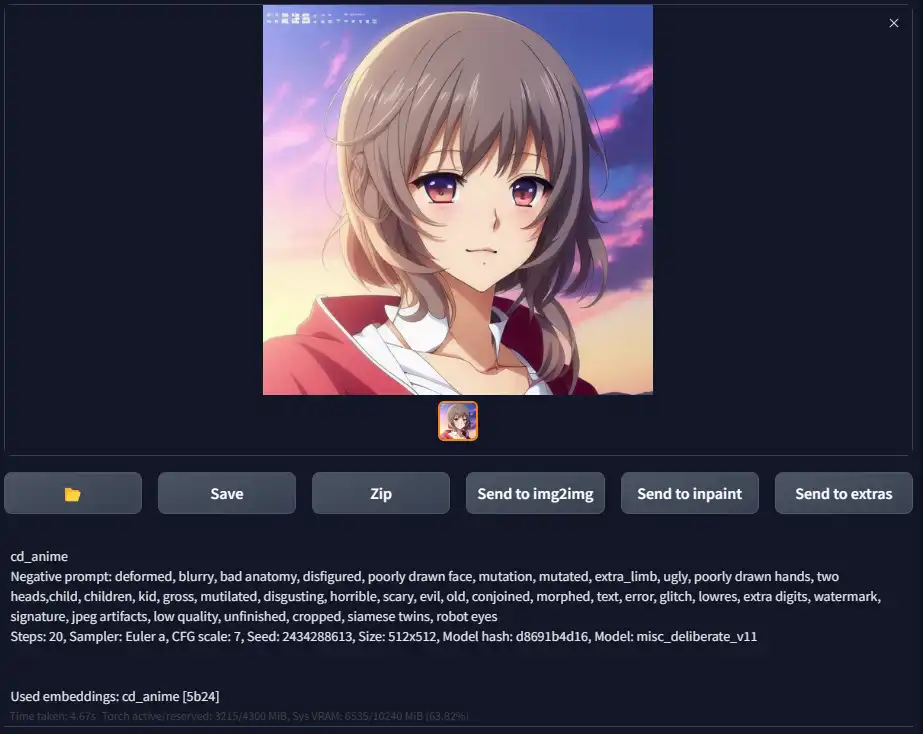
This is the output section where you'll see the results of generations. You can also send the generated image to other tabs using the respective buttons.
If you have the setting active, you will be able to see a preview of the image being generated on this screen as well.
The text section below the preview provides all the important parameters that were used to create the image. It's useful for figuring out some information about your generations when using more advanced features like wildcards or matrix prompts.
PNG Info Tab
The PNG Info tab can be a really useful tool for loading up images you've previously generated or loading images other people have generated.
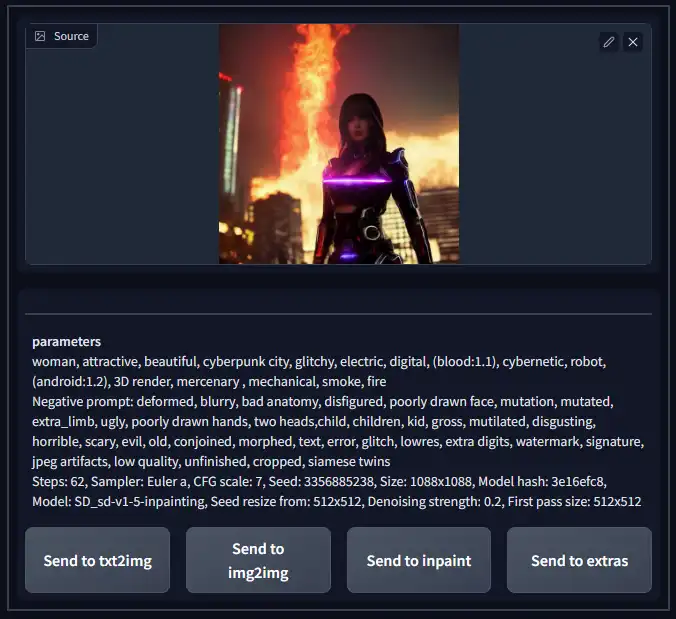
You can drag and drop any .png image that was generated in the WebGUI and it will display all of the parameters used to generate that specific image, including the seed, model and embeddings used. This is a great way to retrieve old images or save prompts/ workflows to be reused later.
It's important to know that this will only work with .png files that were created using the AUTO WebGUI. Any other images will not work, and AUTO images won't work if they have been compressed or the metadata has been removed.
You can click one of the "send to" buttons to transfer all of the image parameters to one of those tabs to easily regenerate that image, or use it as a starting point to generate similar images. Be sure to set the seed back to random, as transfering the image parameters includes setting the seed value to that exact image's seed.
Extensions Tab
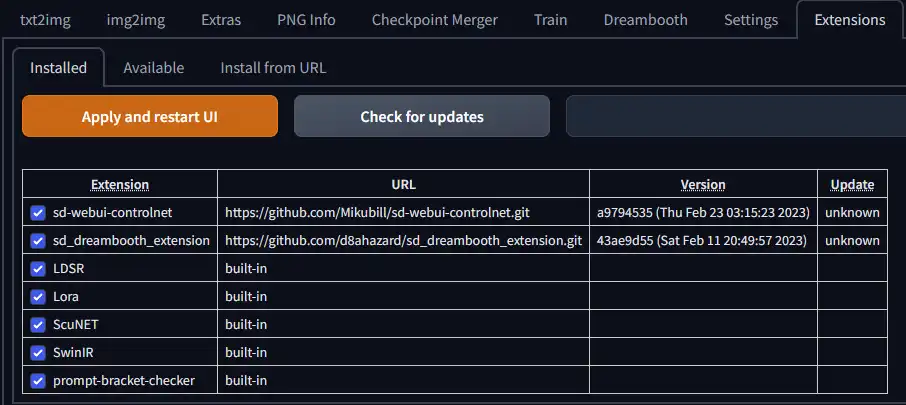
The Extensions Tab is where you can easily install and manage plugins & add-ons to your WebGUI. The Installed tab shows you what extensions you have already installed. As you can see in the screenshot above, I already have the Control Net & Dreambooth extensions installed. Built-in extensions will have their URL as "built-in" and they come installed with the WebGUI already.
You can disable installed extensions by unticking the checkbox next to their names and reloading the UI. To completely remove an extension, you will need to delete its corresponding folder in the
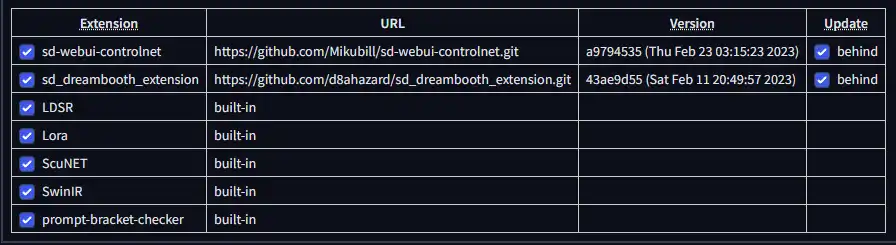
You can check if your extensions have an update available by clicking the "check for updates" button. When clicked, the "update" column will change to a checkbox that says "behind" if there is an update available. You can untick extensions that you don't want to update.
Once the check for update is complete, you will need to click the "apply and restart UI" button to actually install the updates and reload the UI to activate any changes.
Remember to check for updates often, as everything to do with Stable Diffusion is changing at a very rapid pace.
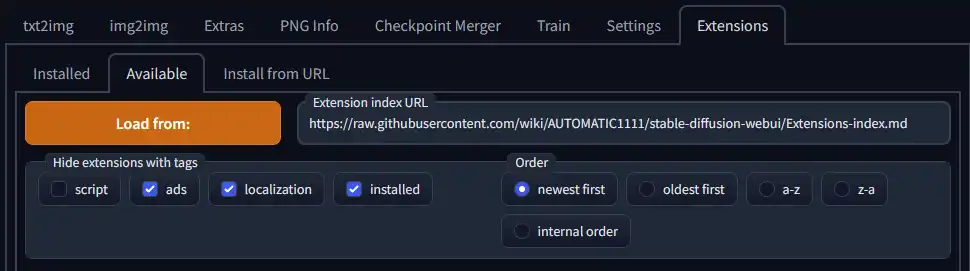
The Available tab is a way to see a list of extensions that were directly added to AUTO's github page. You can however search other lists by entering your own Extension Index URL, however I would recommend using the Install from URL tab if you want to install an extension that doesn't appear on the list.
To see the list of extensions, just click the Load from button and click the "Install" button next to the extension you want to install. It should be a seamless process, however there isn't a good progress bar at the moment, so its hard to know when an extension is installed. Once downloaded, you simply reload the GUI or restart the entire program to load the extension into the WebGUI.

The Install from URL tab allows you to install any extension using a link to its Github repository. There are many people contributing to AUTO's WebGUI and not all of them will be listed on AUTO's Github. This tab should be fairly self-explainatory, but all you need to do is paste the Github Repo link in the URL input and you may choose a name for the extension. Then click install and reload the GUI as with any other extension.